Category Archives: Operating Systems

Como alterar o servidor IMAP no Mail do Mac?

Alterar o servidor de IMAP ou POP3 no Mail do Mac parece ser uma tarefa básica, mas infelizmente nem sempre e a última versão deste sistema operativo adicionou uma funcionalidade que complica um pouco essa alteração.

Se tem o Mac OSX  10.10 (Yosemite) e pretender alterar o servidor IMAP ou POP3 vai deparar-se com o servidor a cinza, impossível de editar. Isto deve-se ao facto desta versão ter uma funcionalidade de atualização e gestão automática das configurações da conta de e-mail.

Ativar edição do servidor de IMAP e POP3 em 10 segundos

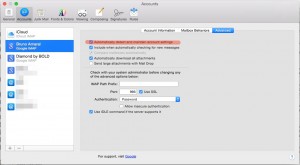
1. Na definição de uma conta na aplicação Mail, vá ao separador Avançado e retire a seleção da primeira caixa (checkbox).

Retirar gestão automática da configuração do servidor IMAP e POP3 no Mail do Mac

2. Mude de conta ou feche a janela para guardar a alteração e já está.


Alterar o servidor IMAP em três passos

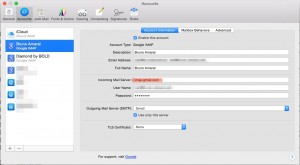
1. Ir às preferências da aplicação Mail e escolher o separador Contas

Configurar servidor IMAP e POP3 no Mail do Mac

2. Na conta que pretender, verifique se o servidor IMAP ou POP3 está cinza. Se estiver, vá ao separador (tab) Avançado e retire a seleção da primeira caixa.

Retirar gestão automática da configuração do servidor IMAP e POP3 no Mail do Mac

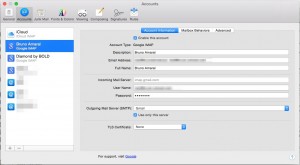
3. Altere o servidor de IMAP ou POP3 para o que pretender. Verifique se tem de fazer mais alguma configuração, como alterar portas.

Configurar servidor IMAP e POP3 no Mail do Mac

Se quiser testar, abra em Window > Connection Doctor para verificar se está a fazer corretamente a ligação.

Making site backup on Linux

Last week i had to make backup’s of some websites through the Linux shell. I usually don’t have to make server administration and i don’t remember all the linux commands that I needed to do the job, then i decided to make this post for future task guide.

When I say backup a site, i mean backup all files, even the ones that were uploaded or changed by the users, and the database.

My projects are under a version control using subversion, but there are some files that are uploaded or changed by site users and aren’t under version control. So, i need to start by cleaning the site folders removing the folder ‘.svn’ from the folders that are under version control.

First of all, i have to know how to remove a folder and all its contents. To do this i can use the “rm” command:

rm -Rf <folder name>

This command remove the folder and all its contents without asking. To achieve this behavior i set “-R” to remove recursively and “-f” to force the action and to don’t ask anything.

After know how to remove a folder, i need to find the folders to remove, this is all the “.svn”. To do this, i use the find command:

find . -follow -name “.svn” -exec rm -Rf {} \;

With the line above i search the current folder “.” and its subfolders for the folder by its name “-name ‘.svn’”, then i want to remove it ‘-exec rm -Rf {} \;’.

The “-name” is a test option for find that allow us search by the files or folders name with a pattern. This way we can search using something like “-name ‘*.jpg’“. There are several other test options that can search for files by its size, its modification date, by its permission configuration, and other. When using pattern matching it can be used with the following special chars:
*                  Matches 0 or more characters.
?                  Matches 1 character.
[AaBbCc]      Example: matches any 1 char from the list.
[^RGB]          Example: matches any 1 char not in the list.
[a-g]            Example: matches any 1 char from this range.

The “-exec” is an action option that allow the execution of other commands during the search. The command ends when the character ‘;’ is found. The “{}” means he file name that mach the condition defined by the options. The chars might have to be escaped with ‘\’ to protect them from expansion by the shell.

The find command is very complex and have many options. If you want more information check the link below.

Now i have my site folder cleaned and ready to backup. Its time to compress it and turn it in one file. To do this i ZIP the whole folder, e.q. to all its content, files and subfolders:

zip -9 -r <zip file> <folder name>

The option “-9” is used to compress more and the “-r” to do it recursively.

To finish the job i make a backup of the database (see the post Import and export a database in MySQL using Linux shell). If the export file isn’t in the sites folder it can be moved there and zipped with the other files.

mv <file path> <destination path>

Remember that the <destination path> includes the file name, even if it will be the same.

Useful links:

Import and export MySQL database using Linux shell

Usually i use phpMyAdmin to configure, change and import/export my databases. However, recently, one of my databases went so big that it i have some problems to export or import it. The solutions is doing it with the Linux shell.

Linux shell can be very painful but can be the solution either. Using it to import or export MySQL databases can be a better and easier way. With shell we can backup all our databases and download only one file, or we can set up a cron job that do backup according to a defined schedule. Another major advantage is the possibility of import large SQL dump files (the phpMyAdmin has a limit).

In this post i’ll explain out to import or export MySQL databases using mysql and mysqldump respectively.

Import MySQL database

Like i said, using the shell we can import larger files, making easier to restore a database or import it from another MySQL server (easy server migration).

First we have to put the file on the server where it will be accessed. This can be done throw FTP or other method.

When the file is in server, run the following command (replace the italic words by your values):

mysql -u username -ppassword database_name < file_name.sql

Or

mysql -u username -p database_name < file_name.sql

In both ways we define the user, the database and the file that has the data. In the second command, instead of define the password in the command, the password will be prompt later.

Export MySQL database

To export a MySQL database is almost the same. This command can be very helpful for schedule database backups. Use the following command (replace the italic words by your values):

mysqldump -u username -ppassword database_name > file_name.sql

The result of this execution is a file_name.sql file that holds your database information. This backup can them be compressed to be smaller, downloaded or stored somewhere else.

Linux File System

As promised I’m writing an “article” about Linux file system to clear up most of the doubts a newbie, like me, might have in relation to this subject.
The most famous FS(I’m gonna refer to File System by FS from now on, just to make my life easier… me very lazy you know!) are ext3, Reiserfs, JFS2 and XFS.All of this are Journaled File systems, ok this means that before it even writes the data to the main file system it logs its changes into a journal, that is in specially-allocated area.This is a very good thing because it lessens the probability of sh*t happening due to a power failure or one of those dreadful system crashes.

Ok lets start with ext3, its an extension of the ext2 FS( duh like the name did not give that little secret up ), although the performance and security is not as good as the others FSs it holds a big advantage that it allows in-place upgrades from the popular ext2 file system without having to back up and restore data as well as requiring lower CPU consumption than ReiserFS and XFS.Due to the “bridge” that exits between ext3 and ext2, the FS is putted back due to the more recent goodies that exist on the more recent FSs, stuff like dynamic allocation of i-nodes and variable block sizes.Using the “fsck” is a no-no while the FS is mounted for writing, a dump taken while it is mounted read-write mode can create corrupt data within the dumpfile.

if you want to defrag ext3 on the FS level forget it, unless you are really in the mood to cross between ext3 and ext2, cause you’ll have to use e2defrag, but it makes you convert to ext2, and when running the defragmenter it may result in a loss of some data.

XFS is a high-performance journaling file system created by Silicon Graphics for their IRIX operating system.A 64 bit FS that support files up to a system size of 8 exabytes( abbreviation EB, and the equivalent of 1EB is 1,152,921,504,606,846,976 bytes…. can u imagine the amount of porn that could be oO?), but on 32-bit linux operating system the size of file system size is reduced to 16 Terabytes.
There is no undelete utility for XFS, can not be shrunk. There are some compatibility issues between different architectures, due to journaling-optimization though XFS provides a utility to solve this problem.The FS delays allocation and ordering of meta-data and data flush to disk. XFS may choose not to write data to the disk when it is received, so loss of data during crash is more likely.Creation and deletion of directory entries is a much slower metadata operation than other file systems.

When ReiserFS was introduced, it offered features then unseen in existing Linux file systems, such as Metadata-only journaling (also block journaling, since Linux 2.6.8), its most-publicised advantage over what was the stock Linux file system at the time, ext2. Online resizing (growth only), with an volume manager named as LVM. Since then, Namesys has also provided tools to resize (both grow and shrink) ReiserFS file systems offline.Tail packing, a scheme to reduce internal fragmentation(handy indeed).

JSF also know as Journaled file system, a 64-bit File System created by the IBM brainiacs, made to be used with AIX, eComStation, OS/2 and Linux operating systems.On this FS recent benchmarks report that it is fast, reliable and that it shows a pretty good performance on many levels. Also told to be light and efficient with the system resources.

Let me remind that this is just a poor attempt of mine to enlighten the few of you who had the courage to read until this point, if you really want to get some heavy duty info about this, then you should go check Wikipedia(Thats were i got ma info!).Remenber people “wikipedia knows all” this is as truth as the truth from House ,”Every body Lies!”. I finish this post with some more detailed info on a couple of FSs.

— EXT3 —

Limits:
Max file size 16GiB – 2TiB
Max number of files Variable
Max filename size 255 bytes
Max volume size 2TiB – 32TiB
Allowed characters in filenames All bytes except NULL and ‘/’
Features:
Dates recorded modification (mtime), attribute modification (ctime), access (atime)
Date range December 14, 1901 – January 18, 2038
Date resolution 1s
Attributes No-atime, append-only, synchronous-write, no-dump, h-tree (directory), immutable, journal, secure-delete, top (directory), allow-undelete
File system permissions Unix permissions, ACLs and arbitrary security attributes (Linux 2.6 and later)
Transparent compression No
Transparent encryption No (provided at the block device level)
Supported operating systems Linux, BSD, Windows (through an IFS)

—XFS—

Limits:
Max file size 8 exabytes
Max filename size 255 bytes
Max volume size 8 exabytes
Allowed characters in filenames All bytes except NULL
Features:
Dates recorded
Yes
Date resolution 1ns
Attributes Yes
File system permissions Yes
Transparent compression No
Transparent encryption No (provided at the block device level)
Supported operating systems IRIX, Linux, FreeBSD (experimental)

—ReiserFS—

Limits:
Max file size
8 TiB
Max number of files 232 (~4 billion)
Max filename size 4032 bytes, limited to 255 by Linux VFS
Max volume size 16 TiB [4] * see Warning
Allowed characters in filenames All bytes except NULL and ‘/’
Features:
Dates recorded modification (mtime), metadata change (ctime), access (atime)
Date range December 14, 1901 – January 18, 2038
Date resolution 1s
Forks Extended attributes
File system permissions Unix permissions, ACLs and arbitrary security attributes
Transparent compression No
Transparent encryption No
Supported operating systems Linux
The Story of the new Laptop

Well here i was, just finished arriving home, minding on my own business, after a stressful ride home from university,when the delivery enterprise arrived with my new laptop, a brand new Toshiba L-40, all wrapped up in a nice box.I took it out ,with the help of my cat, and turned it on, so far so good.Windows Vista and every thing,just one little problem…it came with a very very gay theme, that i couldn’t take out, my solution…recovery CD, simple, effective, and for my surprise it was fast! i thought to myself “less work for me”,but(and there is always a but, as far as my not so vast experience in the computer tech world) as soon as the windows was fully booted i noticed the never ending number of programs running on start up.

Curiosity took me to see what every application did.So i had a Toshiba infoCenter,desktopSms, a trial version of Norton(that not even was enabled),and a few more things that i don’t recall right now.So i got my self busy preparing my new, fresh out of the box, laptop.Started out by running msconfig and unchecking those programs, that i didn’t like to see that much, on the startup.Next went to the program manager and uninstall Norton and every thing else that i didn’t like. Ok so i got myself a Windows Vista ready for my activities.

But why stick only with one O.S. when u can have two!! Fetched my ubuntu 7.10 distro slipped it on the dvd-rom tray and rebooted the laptop.

A new installation started…so i thoughted.To my surprise it did not start installation has it was supposed to.It was a LiveCd, which it is great, always useful when a person is in a tight situation, but it was not the case, at the moment i needed an installer.So i started thinking ” i was sure i selected the Start & install option in the start menu of the cd”… and i did! there it was right in front of me this big icon saying INSTALL i putted two and two together, and there it was the O.S. install interface.

Pretty simple it was, just select the language, the keyboard layout, the partion(even has automatic option, but i prefer manual), ok on the partition department i like to divide my disk in 3 parts (/home,/ and swap) and the type of partition “ext3″(dunno why i choose this one maybe cause its always the first one on the list,need to investigate this).With the partition business done, off to the account config, full name just for info on the system(don’t need this but i like to be picky sometimes), account name! ok here i always choose a small name in lowercase mode, this way its easy and fast to type(here i am picky mode again), next password…no need to tell every that it should be alphanumeric(numbers and letters), more than 6 digits and don’t forget to put it in upper and lower case(can’t be safe enough =P).

Account department done, finally installation starts.Now i have Windows vista and ubuntu 7.10 with a grub loader to choose which one i want to load.Happy?! well no i still need eclipse and java to be able to do some work at my university. Ok so i go console mode, start up by making a backup of my source list (found in /etc/apt/source.list) and changing it by putting the repositories easily found on ubuntuguide.org.

Now for the best part, i have to install packages in Linux, ohhh noo it sooo hardd, i can’t do it =( probably thats what you are thinking right now, well my friend you are wrong, nothing more simple actually, just do sudo apt-get install “program”,et voila, and it does everything for you.Easier then putting pre-cooked meals on the microwave.after a few of this and i got myself a laptop ready to do some programing.

Ok so you don’t feel that much at ease with the console, no piggy the dudes from ubuntu thought about that, just use the synaptic package manager(use the menu system->administration->synaptic package manager)this is a graphic interface that does the same as apt-get and a little more. After all this i finally was happy with what i got,for now at least.Lets see how long will take me to blow up this two O.S.(my record time was 48hours with windows xp =x).

-I finish this Post with a nice picture of the Toshiba L-40 with his very interesting original theme.

Toshiba L-4o with not so good theme

ps-Forgot to mention, but i got this laptotp trough a deal from the local school, therefore the theme…